Rushing home with my new found $5.00 culinary toy, I began experimenting with vegan pasta doughs and organic fillings. I wound up creating 2 different types of ravioli, which were both served for Christmas Eve dinner: Baby Bella Ravioli and Roasted Butternut Squash with Sage Ravioli. This was offered with my homemade organic Italian bread (that will be a recipe for another posting).
Here I present the recipe for the Ravioli Pasta Dough and its preparation.
Simple Vegan Pasta Dough
2 cups flour (white flour is what I used, though you may substitute/mix whole wheat)
2 teaspoons of extra virgin olive oil
1/2 cup water
2 pinches of good salt
Baby Bella Mushroom Filling Recipe is located here on the blog.
In a large bowl, add flour and salt, mixing the two ingredients together so as to distribute your salt throughout your flour. I then add the olive oil and then about half of the water. I prefer to mix my dough by hand as to better control the mix rate and moisture levels. Working from the outside of the bowl towards the center (not unlike folding a cake batter) I work the dry into the wet, adding small amounts of my remaining water as I go. You will end up with a lovely dough ball after 3 to 7 minutes of mixing and kneading your ingredients.
If your dough is too wet, add small amounts of flour and continue to knead, if it is too dry, add small amounts of water and continue to knead. You will discover that finding the balance is quite simple, so breathe, be happy and laugh at the joy of your creation. As an aside, you can wear latex gloves for the mixing part to keep your hands clean, just be sure to buy gloves that do not have a coating or powder on the them.
Once you have your dough made, move to a flat surface for rolling out your pasta. I have a wooden island in the center of my kitchen with a wooden butcher block for a top. I clear this, clean it thoroughly and then dust the top with flour. I separate my dough into 2 separate balls, roughly the same size. Using a french rolling pin
With Ravioli, you have a top and a bottom with your filling inside. Once your dough is rolled out, gently fold it in half so as to create a crease. Then flatten it back out on your working surface. Using a sharp knife, follow the crease line and cut your pasta into 2 separate pieces. Now you have a top and a bottom for your ravioli! Using a pastry brush
A note on ravioli cutters
Now that you have your pasta dough rolled out and cut into 2 roughly equal halves and all excess flour has been brushed off, take your stamp and gently imprint the shape into one side of your dough. This allows you to see how many raviolis will fit on the pasta you have rolled out while also marking where you will place your filling for each one. imprinting is not cutting, so don't press all the way down as to cut the raviolis out of the pasta.
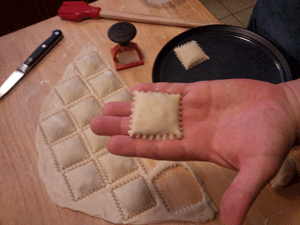
Using a small spoon, place a liberal amount of your filling into the center of each of your ravioli imprints. I have found that more is better when using a hand stamp, just be sure not to overflow onto the edges of your imprint as you want a clear space around each filling (see the photo below).

Once you have placed all of your fillings onto the scored bottom piece of pasta dough, its time to move your attention to the top piece. Using your applicator brush and small bowl of water, brush the top of the other pasta dough half so as to cover its surface area. You are not looking to soak the dough, just get the gluttons going which creates a sticky surface. Then, taking your time, carefully flip the dough over so that the wet surface is facing down above your fillings. Align your bottom and gently place this top layer onto the bottom later. Do not press down on any edge just yet. First make sure that you are covering all sides, adjusting your dough as necessary. Then, beginning on one side, use your fingers to press the dough edge together and begin moving between all of your little filling mounds, pushing the dough together while moving any air bubbles out towards the other side.

Once you have completed this step, take your ravioli cutter and begin stamping out each ravioli by aligning the stamp with the center of your filling and pressing straight down, cutting all the way through to your work surface. Then you can twist your cutter left and right, gently, so as to free each ravioli. Be sure to place a single sheet of wax paper on a plate and then place each ravioli onto the sheet. Do not let them touch or they will stick together. You may stack them with a sheet of wax paper between each layer, but I would not stack higher than 2 levels as these little guys weigh more than you think!
Once you have cut all of your raviolis you can then move onto the other dough ball that you separated out earlier, repeating all of these steps. This dough recipe with a 2" ravioli stamp should yield between 20 and 30 individual raviolis depending on how thin/thick your pasta dough is and how close together you place your stamps. You may refrigerate your finished ravioli until you are ready to boil them, which I recommend you do within 15 minutes of plating. You can also freeze them for later use, which should be done at this point, not once they are cooked. I also recommend sealing them in a single layer using a vacuum press machine
To cook the ravioli, simply take a large pot, add water, a pinch of good salt and a few drops of extra virgin olive oil. When the water comes to a boil, add your raviolis one at a time. Stir the pot gently. When the raviolis float to the surface of your water, they are done and can be plated. Fresh pasta cooks much faster than dry pasta, so your raviolis will be done within 3 to 5 minutes once they enter the boiling water bath.

To plate, I recommend 6 to 12 ravioli, depending on your plate size and if this is a main course or an appetizer. The type and richness of your filling will also dictate how many you choose to serve. Add your sauce or oil topping and garnish.
Buon Appetito!!
___________________________________________________
If you would like to assist in supporting my blogging and recipes, please consider making a donation towards the next meal. Healing the world's health one lentil at a time. Blessings.
1 comment:
Sounds yummy and very easy to make. We can probably make different fillings for each member of the family, knowing how picky they all are.
Congratulations on getting your blog started!
Post a Comment