One man's journey towards changing his medical condition through simply eating. After struggling with chronic Kidney Stones for 20 years; seeing the top specialists in the field and following their diets and recommendations to no avail, a purely vegan diet with a gourmet twist cured the problem!
Growing up in New Orleans I was gifted with having Red Beans and Rice every Tuesday for lunch and sometimes even for dinner. Tuesdays have always been the city's day to have Red Beans and Rice as a main course, along with a side of french bread or corn bread. While this famous dish has typically consisted of ham hocks and boudin (Cajun sausage), I have adapted the recipe to a vegan menu, keeping all of the rich flavors while also substituting a grain-based sausage that even my Grandmother would love! High in natural plant proteins and rich in complex flavors, this easy to make classic can be cooked on the stove top or in a crock pot and can be frozen for easy reheating throughout the week.
Ingredients
2 lbs. Organic Red Kidney Beans 2 Large Organic Onions (diced) 2 Large Organic Bell Peppers (Red, Yellow and/or Green - diced) 5 Stalks Organic Celery (diced) 6 Organic Garlic Toes (minced) 4 to 6 Organic Bay Leaves (whole) 2 to 6 dashes of Louisiana Tabasco (to taste) Tony Chachere's Creole Seasoning (to taste in place of salt) Black Pepper (to taste) 2 to 4 cups Organic White or Brown Rice 1 pack Field Roast Grain Meat Company Sausage (Italian or sage flavor) 4 Tbs Olive Oil 1 (12 oz) can Organic Diced Tomatoes (optional) Water
Tools
1 Large Saute Pan 1 Large Capacity Crock Pot 1 Saute Spoon 1 Chef's Knife and Cutting Board 1Garlic Press 1 Rice Cooker or Pot for stove top cooking
Lets Talk Beans and Seasonings
The primary ingredient in Red Beans and Rice is red kidney beans. In New Orleans, most chefs can go to their local grocery store and buy a 1 or 2 lbs bag of Camellia brand red beans. For the rest of us, we can buy them online or use a different red kidney bean. Living in California, I go to my local Whole Foods Store and I purchase the organic bulk red kidney beans. I do not mention this because I am representing either company, but to simply make the point that red beans differ slightly with region. While I grew up on Camellia brand beans, the organic bulk red kidneys are the next best thing as far as my own taste buds are concerned. The main thing to know is that you want fresh organic dry red kidney beans - not canned, not cooked and not pre-soaked, sitting in liquid.
Some chefs pour their dry red kidneys into a large bowl and fill the bowl to the brim with cold water and let the beans rest overnight. This hydrates them and has been argued to speed cooking times and tenderness, as well as removing some of their gasses. While I have done this many times myself, having cooked red beans more times than I could count, I have also prepared them without soaking overnight. The results in flavor and tenderness are no different. The recipe presented here is without soaking - just pour the dry beans directly into your pot and go!
Nothing says New Orleans and Creole cooking without the proper seasonings. Most local groceries are carrying these Dixie Land favorites, but if not, they are available online. I am speaking of New Orleans Tabasco (Hot Sauce) and Tony Chachere's Creole Seasoning (Chachere's is pronounced Sat-chur-ies). This seasoning also comes in a reduced sodium blend. Another competitor to Tony's, which you can use if you prefer, is "Slap Your Mama!" seasoning and is similar in taste. Nothing replaces these flavors and they really are essential for authentic New Orleans Red Beans!
Lastly, the preferred New Orleans method of cooking is on the stove top in a large soup pot over a gas flame. This takes a lot more attention throughout the long cooking day, as your beans will need to be stirred regularly for the 4 to 7 hours they simmer to avoid scorching.
The other method, which I will present to you in this recipe, calls for a digital crock pot. The outcome is absolutely the same, having tested these methods side by side personally, I can guarantee the crock pot final product! The other benefit is that you can prepare the base and mix your ingredients in the morning, set your crock pot and walk away for the entire 7 hours of cooking without having to stir once!
Step One: Making the Base
The first thing you want to do is dice your onion, bell peppers, celery and prepare your garlic toes for pressing. In your large saute pan, add your olive oil and bring your temperature up. Once your oil is hot, add your diced veggies and then press your garlic toes, mixing everything together. You will cook your vegetable mixture over a medium-high heat, stirring regularly. Add your fresh cracked black pepper to taste and some Tony Chachere's Creole Seasoning.
As your onions begin to become clear and the juices are releasing into the pan, add 1/2 cup of water. Mix the water in and turn up your heat to begin reducing. This is the process of cooking the water out of the pan while further expelling the liquids from your veggies. Do this process 2 times.
Step Two: Cooking the Beans
Add the dry red kidney beans to your crock pot. Just pour them right into the pot and then add cold water, covering the tops of your beans. Be sure not to fill the crock pot to the very top with water as the beans will absorb the liquid and begin to expand over the next hour. You must leave room for this expansion to occur or you will have a mess on your counter. Season your water with Louisiana Tabasco and Tony Chachere's, remembering that a little goes a long way. It's alright if your beans are a bit on the mild side once cooked as you can always season each serving to taste. Add your bay leaves next.
With your vegetables reduced, pour the mixture directly into the crock pot with the beans, water, seasoning and bay leaves and mix everything together, being careful not to break up your bay leaves as you will not eat these, but will remove them from the final dish after your beans are fully cooked.
Red Beans and Rice are made in slightly different ways depending on the region of Louisiana or the family cultural heritage. If you would like a richer, slightly more creamy dish with a deeper flavor, add a can of organic diced tomatoes at this juncture and stir together. This brings in a taste of creole.
Set your crock pot to high and your timer to 7 hours. You can literally walk away and wait for the finishing bell. If this is your first time making the dish, I recommend that you check the beans often during the first 45 minutes as they expand, making sure that you haven't accidentally overflowed your pot. You may also stir occasionally, tasting in the last couple of hours and adjusting seasonings.
Step Three: Bringing it All Together
In the last hour of cooking, make a pot of either white or brown rice. The classic New Orleans Red Beans and Rice is made with white short grain rice. Do not add the cooked rice to the finished pot of red beans. To serve, you will add rice to your empty bowl, then ladle your beans over the rice. Lastly add your "meat" to the dish. I use the Field Roast Grain Meat's Italian sausage which is easily found in the Vegan section of Whole Foods or other health markets. Cut the sausage into 1/4 inch rounds, just as you would any other andouille or whole linked sausage. Then brown both sides in a hot pan coated with a touch of olive oil. Add directly to your bowl of red beans and rice.
Laissez le bon temps rouler!
(Let the Good Times Roll!)
If you would like to assist in supporting my blogging and recipes, please consider making a donation towards the next meal. Healing the world's health one lentil at a time. Blessings.
Keeping with the Asian cuisine theme of the last post, this week I delved into the land of Pot Stickers! This recipe is a healthy meat alternative for those who just love Pot Stickers and the flavor and texture of ground meat, just without the actual meat (you wouldn't know the difference if you didn't know there was no actual meat). I will walk you through making your own dough, the filling, forming the pot stickers and cooking them up; along with a homemade Asian inspired dipping sauce.
Ingredients
2 cups all purpose flour
1/2 cup water (tepid to warm)
3/4 cup baby bok choy (blanched and chopped)
3/4 cup Asian cabbage (blanched and chopped)
1/2 cup organic carrots (diced)
1/2 cup organic green onions (diced)
4 medium toes organic garlic (diced or pressed)
1 Tbs organic fresh ginger (peeled and diced fine)
3/4 bag Boca Meatless Crumbles (the 12oz frozen bag)
2 Tbs white rice vinegar
1/2 tsp organic agave
1/4 tsp sesame oil
1/4 tsp soy sauce
salt and pepper to taste
The Pot Sticker Dough
The first step is to make your dough so you can set it aside to relax while you make your filling. In your mixing bowl, combine 2 cups of flour and 1/2 cup of tepid water and mix by hand. You are welcome to use a mixer with a dough hook, but I prefer the hand mixing method. You want a tepid to warm temperature water and you can add a bit of water at a time while mixing. I keep a small cup of flour and some extra water on hand before I begin, adding a small amount of either to adjust the consistency if necessary. You are looking for a well mixed dough that you knead for 10 to 15 minutes. Then cover with plastic wrap and set aside for 20 minutes. Just before I roll out my pot sticker dough, I knead for another 5 to 10 minutes as I found that after the dough has rested and then is kneaded again, you get a stronger, more flexible finished product.
The Filling
Like with any other wok cooking, you want to prepare all of your vegetables ahead of time, so when it is time to cook, you are not faced with needing stop and chop. Remember that wok cooking is done on high heats with a lot of motion in a small amount of time.
I begin by washing my baby bok choy and asian cabbage, cutting the leafy greens off of the stems, as we will only be using the greens. You can substitute green or purple cabbage in place of the Asian cabbage or double your bok choy if you don't want cabbage at all. Next we will blanch our leafy greens by bringing a medium stock pot filled with water to boil. Add your greens and let simmer for 10 minutes or until your water turns a beautiful shade of green. Remove the bok choy and cabbage and place directly into a bowl of ice water. This stops the cooking process. Then take a handful of greens and queeze the water out, forming a clump in your hand. Next chop your greens into a loose dice.
Then wash and dice your carrots and green onions. Then peel and dice your fresh ginger root. If you love ginger you can add a bit more, but remember that ginger is a potent root and will quickly over power all of the other flavors. Then peel and press your garlic toes. If you don't have a press or prefer to chop, then finely dice your garlic.
In your medium wok, add a teaspoon of sesame oil and bring to high heat. Then add your carrots, green onions, ginger and garlic, stir frying continuously for 5 to 10 minutes or until your carrots begin to soften. Next add your Boca meatless crumbles directly into the wok. I like Boca crumbles because they give you the consistency of a ground pork or beef and absorb the flavors around them quickly. I take the bag right out of the freezer and break all of the crumbles apart before opening the bag and measuring out my amount. Do not defrost them first, just add the frozen crumbles right to the wok. Continue to stir fry all of your ingredients together for another 5 minutes. Add 1 Tbs of sesame oil, 1 Tbs of soy sauce, and 1 tsp of white rice vinegar to the mixture, along with a few pinches of pepper. If you want to spice things up more, you can add some chili flakes! Lastly, add your blanched, chopped greens and continue stir frying for a minute or two as your greens heat up and mix in. If your mixture is too dry and not coming together, you can simply add 1 tsp of corn starch to some water, mix until dissolved and add to your mixture while still stir frying over high heat at the very end. This will act as a bonding agent to your filling. Turn off your fire and place your filling in a bowl and let cook completely.
Rolling out your Dough
As mentioned earlier, I knead my dough for another 10 to 15 minutes after it has rested fully. Flour a flat, clean surface and pull off a small amount of dough, rolling it into a ball between your palms. Using your rolling pin, push down hard while rolling out in one direction, then turn your dough and roll out in the opposite direction. You are rolling out a small, thin circle. The circle needs to be about the same thickness all the way through and large enough to cover your Pot Stickers Mold Shaper. A couple of notes to help you out: be sure to have extra flour on hand and dust your rolling pin and flat surface between each rolling. If you are going to roll out all of your dough at one time, place sheets of parchment paper or layers of flour between the finished dough circles or they will stick together and become impossible to separate.
Molding your Pot Stickers
This is my favorite part! I like using the Pot Stickers Mold Shaper only because it is fast and keeps all of your portions identical, which is great for events or dinner parties (and for a cool kitchen tool under $5.00, you just can't live without one). I begin by setting up my area with my rolled out dough circles, my chilled filling, extra parchment paper, a little bowl of water (to seal the pot stickers), a little bowl of sesame oil (to grease the mold) and my Pot Stickers Mold Shaper.
Begin by oiling your Pot Stickers Mold Shaper with sesame oil. You only need a thin coat and will only need to apply a new coat after 4 to 5 finished pot stickers. Then place a round dough circle, centered, on top of your Pot Stickers Mold Shaper. Spoon one to one and half spoon fulls of filling into the center of your dough where the well is located on the mold.
Next, using a clean finger, apply a bit of water to one side of the dough, along the bottom of the mold from hinge to hinge. This will act as a glue when pressing the dough together. Then gently bring the handles together and press firmly.
Next, use your fingers to pull straight down on the excess dough, while keeping the handles together. This allows you to remove the excess while creating a nice Pot Sticker edge. I make a pile of the excess dough and at the end, I knead it together and roll out as many circles as I have and make those into Pot Stickers as well.
Set these aside on your parchment paper, making sure they do not touch, as the dough may adhere together. Also be sure not to stack them.
Cooking the Pot Stickers
Now that you have formed all of your Pot Stickers, you are ready to cook them up! This recipe will make between 25 and 40 Pot Stickers, depending on how you roll your dough out. I tend to average about 35 when I follow these measurements. Decide how many you are cooking for this meal and set those aside. You can take the remaining dumplings and place them directly into the freezer, freezing them solid and then portioning them into ziplocks or storage containers for later meals. You do not need to defrost them when you are ready to cook more, just take as many as you want out of the freezer and follow the next steps as written.
Using your wok or skillet (I do not recommend using a non-stick skillet as these are called Pot Stickers for a reason), add a Tbs of sesame oil and bring your wok to high heat. Place enough pot stickers in the wok to cover the bottom, but not so they are touching or overlapping. Let them sear in the oil for about 1 minute, then carefully add just enough water to coat the bottom of the wok. Not so much water that they are swimming in a pool!
This will instantly create a billow of steam, so quickly cover the wok to create a steam bath. I use a smaller wok flipped on top of my medium wok for this. Let steam for exactly 2 minutes.
When your 2 minute is up, remove the lid (or small wok cover) and all of the water should have evaporated. If you still have a bit of water remaining, leave the cover off and let the water finish turning to steam.
Use a pair of tongs to gently remove your cooked and steamed Pot Stickers. I recommend serving these little wonders with a dipping sauce consisting of the following mixture:
2 Tbs white rice vinegar
2 Tbs water
1/2 tsp organic agave
1/4 tsp sesame oil
1/4 tsp soy sauce
salt and pepper to taste
Sesame seed, green onion shaving and/or red chili flakes on top.
If you would like to assist in supporting my blogging and recipes, please consider making a donation towards the next meal. Healing the world's health one lentil at a time. Blessings.
Today we move our pallets to an amazing taste of the orient. Inspired by the works in Chinese Dim Sum (Chinese Edition)(which also has full English translations throughout), I formulated and created an organic spring roll full of healthy choices with flavors that play out in the mouth not unlike a fine aged wine or amazing pure chocolate. The prep time on these takes longer than the actual cooking time and they can be frozen and used later if you so desire.
Ingredients
1 Pack Sunlee Rice Springroll Rounds (Size 16 cm) (From your local Asian Market)
1 Bowl of Water
1 Organic Yellow Onion (diced - you may substitute Asian green onions)
3 Stalks Organic Celery (diced)
3/4 Cup Shiitake Mushrooms (diced)
3/4 Cup Baby Bella Mushrooms (diced)
1 Can Bamboo Shoots (diced)
1 Can Chestnuts (diced)
1/2 Cup Organic Carrot (diced)
3/4 Cup Baby Bok choy (blanched then chopped)
2 Tbsp Cornstarch (dissolved in water)
2 Tbsp Organic Sesame Oil
1 Tbsp Organic Shoyu (soy sauce)
1 Tbsp Organic Agave Nectar
1/4 tsp Sea Salt
1/4 tsp White Pepper
4 Tbsp Hoisin Sauce
Tools
Chinese Wok
Chinese Wok Spoon for Stir Frying
Blanching Pot
Bowl of Water
Chef Knife
Cutting Board
Measuring Spoons
Measuring Cup
Parchment Paper and Scissors
The Spring Roll Filling
Asian cuisine is an art form to all of the senses: the layers of taste, the texture, the aroma and the visual presentation. This does not mean that you have to be an artist to make this dish. Asian culinary secrets are found in the most important place, within each and every one of us as we posses the ability to relax and breathe. The invitation from this dish is to be in a mindful place of being with yourself as your prepare each stage. This means simply noticing your thoughts, your breath, your body and not holding onto or judging anything that arises from within you. From chopping to stir frying to rolling the rolls, simply BE with you and with the ingredients. I guarantee that if you do this, your dish will sing in ways that will blow you away!
Begin with your baby bok choy. You can find fresh organic baby bok choy at your local farmer's market, Asian market or grocer. I buy mine at my local farmer's market. Wash it thoroughly and then cut the leafy tops off just below where the leaves terminate into the stalk. You can use the white bottoms in other stir fry dishes or soups, we will not be using them in this dish.
Bring a pot of water to a boil while you are cleaning and prepping your baby bok choy as you are going to blanch the leaves. To do this, have a bowl of cold water also ready near your boiling pot of water. Drop your leaves into the water and let them boil for 2 to 5 minutes. The water will turn a beautiful green and your leaves will become even more vibrant. Carefully scoop them out of the water and place them immediately into the cold still water to stop the cooking process.
Next, take a handful of leaves and ball them into a mass in your hand, gently squeezing the excess water out. Then chop the mass of greens into a loose chop. Not too fine as the leaves will greatly reduce in size upon cooking.
Set your chopped baby bok choy aside and move onto your other ingredients. You are now going to dice each of the following, keeping in mind that you want all of your dice to be about the same size and shape across your various ingredients for a texture consistency in your final dish: onion, celery, carrots, bamboo shoots, chestnuts, shiitaki and baby bella mushrooms.
I buy the 8 oz cans of Dynasty brand bamboo shoots and water chestnuts from my local Asian market and then drain and dice the ingredients. I pick up my mushrooms from my local Farmer's Market from "The Mushroom Lady" (see my Mushroom and Garlic Soup for more about her amazing fungus!) Wash your shrooms, removing any woody stems and then dice. I mix my two mushroom dices together in a separate bowl in preparation for the wok.
Next we are going to prepare our wet mixture, which will also go into the wok in the last stage of cooking. In a measuring cup, add your cornstarch and enough water to cover completely with a splash more. Mix the two together thoroughly. Then add your sesame oil, Shoyu, agave, salt and pepper. Mix all of the ingredients together and set aside.
The wok is an amazing culinary invention and a must have for any kitchen, especially for those vegans out there! I have 3 different size woks, but for this dish I chose my largest (18") carbon steel hand hammered Pow Wok from China. If you are in the market for an authentic Chinese wok, visit The Wok Shop as their prices are AMAZING and no one does Woks like they do! If you are in Northern CA, you can visit their shop in San Francisco's China Town district.
Heat your wok on high heat. I use a gas stove, which is the preferred heat source for this type of cooking. Add a couple of table spoons of good sesame oil and let the oil get really hot, to the point that you smell the aroma of the oil. Add your onion, carrot, celery, bamboo and chestnuts and begin stir frying. This means using your wok spoon to move the ingredients around in a fairly continuous motion, remembering that the center of the wok is the hottest point and the sides cool more and more as you move away from the center. In the end, you are looking for the carrots to cook all the way through, being the toughest member of your veg medley.
After a good 10 minutes or so, add your baby bok choy and mushroom mixture and continue stir frying your ingredients together, making sure to evenly distribute all the bok choy as it cooks. Take your time. Keep breathing and being with yourself and your dish in a mindful way.
The wet mixture you made earlier is now ready to be added to your wok. Give the sauce one more good whisk and then pour it into the middle of your veg. Your carrots should be about fully cooked at this stage. Mix everything together, noticing how the sauce thickens the mixture - the magic of cornstarch!
Scoop your filling into a bowl and set aside to cool. You will want your filling to reach room temperature or even cooler before using it to make your rolls. You can place it in the fridge if you are short on time.
The outer wrapper
The wrappers are simply made of rice and water and are firm and brittle when removed from the package. I buy mine from my local Asian market. They come in several sizes and shapes. For these rolls I use the 16 cm rounds from Sunlee. I recommend you take one out and try to fold it in half to see how rigid it is out of the bag, impossible to make a roll! So we add the magic of water.
I set up my rolling work space by using a wooden chopping board to roll on, a large shallow bowl with water to soften my outer rice papers with, my filling and a container lined with parchment paper to house the finished rolls. Remove all of your rice paper skins from the plastic wrapper and have a kitchen towel on hand to keep your fingers clean. You do not want to contaminate your water or accidentally smear excess filling around your work area.
Begin by placing a fresh skin into your bowl of water and fully submerge it. give it a good 10 count and then flip it over for another 10 count then flip it again. You will notice how it immediately begins to soften. Remove the wrapper from the bowl and let the excess water drip off. Place it flat onto your wooden cutting board with the bumpy side facing you, as this is the inside of the roll. The smooth side of the wrapper is the outside of your finished springroll. With your fingers, wipe the excess water away. Using a small spoon (abut a teaspoon in size), place 2 scoops of ingredients about 1/4 of the way onto your wrapper. Use your fingers to make sure the scoops are evenly distributed together and form a nice line.
Gently fold the bottom of the wrapper up and over the top of the filling.
Then, gently fold the left side up and over onto the filling (not unlike wrapping a present).
Then gently fold the right side up and over the filling. Now you have an envelope shape.
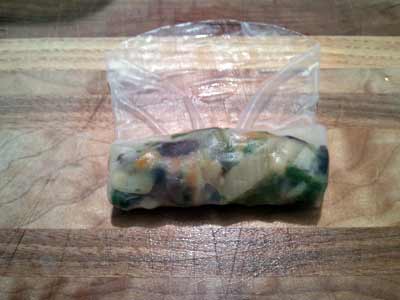
Using your fingers to tuck the filling in, towards your body, roll the wrapper one time forward, away from your body.
Roll again, pulling back slightly to maintain some tension on the wrapper and roll the rest of the way. You have your finished roll! Place the roll on parchment paper and be careful not to touch the sides of your rolls together or to stack them without parchment paper between them as they will stick together and may be almost impossible to separate. Serve them with a Hoisin dipping sauce.
You can also deep fry these finished rolls in vegetable oil, but here we are looking to keep health up and excess fats down, so I opted not to fry them. Serve with a fresh cup of hot Chinese whole leaf Jasmine tea!
If you would like to assist in supporting my blogging and recipes, please consider making a donation towards the next meal. Healing the world's health one lentil at a time. Blessings.


