Most of my life I have noticed how there has been an inner voice, a calling to the quiet deep forest of thought and breath. There was only one thing that I wanted for my 15th birthday and that was the money to take a Transcendental Meditation Course. My parents did not understand this at first, thinking so many different things, "Is he doing drugs?!" "Is this code for something else?" "Is this devil worship!?" I raised the money and I took the training.... and then actually sat twice a day, every day!
They were only too happy to see the changes in me as I entered into daily meditation, centering my teenage anxieties and calming my moods - even my skin seemed to clear up! Soon they were saying things to me like "Oh please just go meditate!"
Even earlier in my life I heard family members saying how I was going to be a priest or some sort of monastic because of my calm nature or some other quirky thing they saw in my behavior, that to them meant a path of spiritual pursuit. They were not too far off the mark. It took me most of my life to this point to realize that my happiness has always been connected to the inner journey. I spent my first many years chasing psychology and therapy-based techniques as I wanted to work with people in need. First was my training and Certification in Co-Active Coaching, then I spent a year studying Gestalt Therapy Techniques, then I trained and became a Certified Clinical Hypnotherapist and then took the plunge to go back to school to get my Masters in Psychology and then graduating in April 2010 with my Doctorate in Clinical Psychology. A lot of training. A lot of internships. A lot of time. And through it all, I was never truly content, never really happy with my overall path. Sure, I liked the tools, the theory, the mental challenges, but the road I was searching always left me feeling, well, unfulfilled.
Throughout my life and all through my various trainings, I would dip a toe into spiritual waters, studying many religions and belief systems along the way. Only running back to the disciplined teachings of science and taking with me an unhappy demeanor. I rationalized that my moodiness was because of school, internships, having no time while juggling papers, research and dissertation time... Once I graduated with my doctorate, I realized I had a wall of papers, all in their little frames, a massive financial aid debt and almost no desire to be a Psychologist. What I wanted in my heart (not my head) was the one thing that for 27 years had stayed a constant amid all the changes in my educational life - my meditations.
With this realization and a lot of help from my partner, I took the plunge and said the words that were waiting to be said aloud, by me, since I was a child. "My calling is to be a Buddhist on a monastic path." This was on a Sunday afternoon. On Monday morning there was an email from Tricycle Magazine (a Buddhist magazine I subscribe to) with a link to an event in Long Beach in May with the Dali Lama offering a rare initiation ceremony. So I followed the link, filled out the forms and received an email inviting me to attend, to take the vows! I was swimming now, moving through the currents and feeling more excited than I had at any point in all of my scholarly trainings!
With this path comes more schooling - but schooling that will not only allow me to study in the ancient ways of the Tibetan Buddhists towards the enlightenment of all beings everywhere, but to learn another way to work with people who are struggling and asking for help. From compassion, coupled with my other trainings, I hope to teach Eastern philosophy and the Dharma (the teachings of the Buddhist traditions). Of course a teacher and friend likes to remind me, "If you want to make God laugh, tell him your plans." So we shall see what my path will be. What I can say with only a week and a half into this adventure, is that I am filled with more peace and happiness than I have felt in a very, very, long time.
On this path as a Buddhist student, I have a lot of studying to do before the May vows in front of His Holiness the 14th Dali Lama. So I am learning to let go. I am learning to be humble and to take what is offered and to be in the moment, even when it feels scary. In the Pali tradition of Dana, which means generosity, I have created a wish list from Amazon.com of the books that I am to study before my initiation in May and ask that if you have the means to spare a few dollars and would like to help me on my path of learning, please feel free to click on the links and choose a book. Most are for the Kindle and are inexpensive, but together are more than I can currently afford. Buddhist teachers have been teaching through the tradition of Dana for more than a thousand years, where those who learn from them or wish to simply support their path, whether with food offerings, clothing or money, made offerings of Dana.
Thank you for your energies and well wishes. Be good to yourselves and live for your own true calling in love and compassion.
Namaste.
Monday, January 10, 2011
Thursday, December 30, 2010
Baby Bella Mushroom Filling (Raviolis)
In the last blog post I wrote about my homemade ravioli pasta. In today's piece, I will share one of my organic vegan filling recipes, which is made with baby portabella mushrooms as the main ingredient. When I make this filling for raviolis, I make it in advance of my pasta dough so it has time to cool. The photo below shows the mushroom ravioli on the left side covered in a tomato mushroom ragu and then roasted butternut squash with sage raviolis on the right.

Ingredients
1 large organic onion (yellow or red)
3 toes organic garlic
1 large organic roma tomato
1 medium organic bell pepper of any color (optional)
3 stalks of organic celery
15 to 20 baby bella mushrooms
1 small tub vegan gourmet cream cheese alternative (Whole Foods carries this)
3 to 6 Tablespoons extra virgin olive oil
Salt and pepper to taste
1/2 cup water
 To begin, prepare all of your fresh ingredients. Dice your onion, celery and tomato into a small dice. Cut up your mushrooms into a medium dice, being sure to thoroughly wash and snip the ends of the mushroom stems first. If you love bell pepper, you are welcome to add 1 bell of any color, also diced small. For the garlic, I grew up using a garlic press
 and prefer this method to a standard garlic fine dice. Either way, peel your garlic toes and set them aside.
Using a large sauce pan, coat the bottom with a glaze of extra virgin olive oil and bring the heat up. I start on a higher heat using a gas stove to get my oil up to temp faster. I then crack a few tablespoons of whole black pepper corns into the oil along with my kosher sea salt. Then add your onion, celery and bell pepper (if you decided to add the bell). Mix all together and begin the reduction process. Take your garlic press and add your garlic directly to the mixture. In traditional Cajun cooking, this is the base for a wide variety of dishes and you will see this mixture used a lot in my recipes. In New Orleans, Chefs refer to the Onion, Celery and Bell Pepper as the holy trinity (and of course the garlic must be in there!). This is similar to the French mirepoix, which is the combination of onion, carrot and celery.
Making sure all of your ingredients are mixed together evenly in the pan, add a small amount of water to coat just the bottom of about half of your pan and mix together. This will assist in cooking the veggies down, while releasing all of those wonderful aromas and flavors! Stir occasionally for 5 minutes or so and then add your mushrooms. Mix them all together and allow the pan to sit, stirring occasionally. Add your roma tomato last and stir into your mixture. I like to reduce 2 times, so once your water has mainly been absorbed and/or evaporated from the first amount, add another splash to cover the bottom of about half of your pan. Mix and let come up to a simmer again, stirring occasionally. Remember to taste, taste, taste! Add salt and pepper as needed at this stage.
 Take the mixture off of the fire and allow to cool while you make your pasta dough. Once the stuffing has cooled and your dough is rolled out and you are ready for the filling, take a small bowl and spoon about 1/4 of your mixture into the bowl. Using your Vegan Gourmet Cream Cheese Alternative, mix 2 to 4 tablespoons of the cream cheese into the small bowl with your veggies. Use your spoon to gently mix the cream cheese completely with your vegetable mixture. Taste and season again. The cheese will help to cool the mixture even more and give you a creamy texture while also acting as a bonding agent to keep your filling manageable when you are spooning it out onto your dough. Your filling is made and ready for stuffing!

Once your raviolis are made, if you have any remaining stuffing in the sauce pan (cream cheese free), you can use this as a base for your sauce. I add to this base sliced baby bellas, 1 to 2 roma tomatoes diced and 1 can of organic tomato sauce (unless I have previously made my own tomato sauce, which I would use instead). Simply combine your ingredients and bring to a simmer. Taste and adjust your salt and pepper and you are ready with a wonderful topping! If you used all of the ingredients in your raviolis, simply start from the beginning and make your base, then add the items listed in this paragraph and you are good to go!

Buon Appetito!!

Ingredients
1 large organic onion (yellow or red)
3 toes organic garlic
1 large organic roma tomato
1 medium organic bell pepper of any color (optional)
3 stalks of organic celery
15 to 20 baby bella mushrooms
1 small tub vegan gourmet cream cheese alternative (Whole Foods carries this)
3 to 6 Tablespoons extra virgin olive oil
Salt and pepper to taste
1/2 cup water
 To begin, prepare all of your fresh ingredients. Dice your onion, celery and tomato into a small dice. Cut up your mushrooms into a medium dice, being sure to thoroughly wash and snip the ends of the mushroom stems first. If you love bell pepper, you are welcome to add 1 bell of any color, also diced small. For the garlic, I grew up using a garlic press
Using a large sauce pan, coat the bottom with a glaze of extra virgin olive oil and bring the heat up. I start on a higher heat using a gas stove to get my oil up to temp faster. I then crack a few tablespoons of whole black pepper corns into the oil along with my kosher sea salt. Then add your onion, celery and bell pepper (if you decided to add the bell). Mix all together and begin the reduction process. Take your garlic press and add your garlic directly to the mixture. In traditional Cajun cooking, this is the base for a wide variety of dishes and you will see this mixture used a lot in my recipes. In New Orleans, Chefs refer to the Onion, Celery and Bell Pepper as the holy trinity (and of course the garlic must be in there!). This is similar to the French mirepoix, which is the combination of onion, carrot and celery.
Making sure all of your ingredients are mixed together evenly in the pan, add a small amount of water to coat just the bottom of about half of your pan and mix together. This will assist in cooking the veggies down, while releasing all of those wonderful aromas and flavors! Stir occasionally for 5 minutes or so and then add your mushrooms. Mix them all together and allow the pan to sit, stirring occasionally. Add your roma tomato last and stir into your mixture. I like to reduce 2 times, so once your water has mainly been absorbed and/or evaporated from the first amount, add another splash to cover the bottom of about half of your pan. Mix and let come up to a simmer again, stirring occasionally. Remember to taste, taste, taste! Add salt and pepper as needed at this stage.
 Take the mixture off of the fire and allow to cool while you make your pasta dough. Once the stuffing has cooled and your dough is rolled out and you are ready for the filling, take a small bowl and spoon about 1/4 of your mixture into the bowl. Using your Vegan Gourmet Cream Cheese Alternative, mix 2 to 4 tablespoons of the cream cheese into the small bowl with your veggies. Use your spoon to gently mix the cream cheese completely with your vegetable mixture. Taste and season again. The cheese will help to cool the mixture even more and give you a creamy texture while also acting as a bonding agent to keep your filling manageable when you are spooning it out onto your dough. Your filling is made and ready for stuffing!
Once your raviolis are made, if you have any remaining stuffing in the sauce pan (cream cheese free), you can use this as a base for your sauce. I add to this base sliced baby bellas, 1 to 2 roma tomatoes diced and 1 can of organic tomato sauce (unless I have previously made my own tomato sauce, which I would use instead). Simply combine your ingredients and bring to a simmer. Taste and adjust your salt and pepper and you are ready with a wonderful topping! If you used all of the ingredients in your raviolis, simply start from the beginning and make your base, then add the items listed in this paragraph and you are good to go!

Buon Appetito!!
___________________________________________________
If you would like to assist in supporting my blogging and recipes, please consider making a donation towards the next meal. Healing the world's health one lentil at a time. Blessings.
Wednesday, December 29, 2010
Simple Vegan Pasta Dough (Raviolis)
Don't you just love creating something new, something never before made with your own hands! This past holiday I decided to serve a completely homemade organic Christmas Eve Italian meal. After seeing Tron Legacy in the theater the weekend prior, we went window shopping where I found a wonderful ravioli stamp and had to buy it! Sometimes the tools dictate the menu!
Rushing home with my new found $5.00 culinary toy, I began experimenting with vegan pasta doughs and organic fillings. I wound up creating 2 different types of ravioli, which were both served for Christmas Eve dinner: Baby Bella Ravioli and Roasted Butternut Squash with Sage Ravioli. This was offered with my homemade organic Italian bread (that will be a recipe for another posting).
Here I present the recipe for the Ravioli Pasta Dough and its preparation.
Simple Vegan Pasta Dough
2 cups flour (white flour is what I used, though you may substitute/mix whole wheat)
2 teaspoons of extra virgin olive oil
1/2 cup water
2 pinches of good salt
Baby Bella Mushroom Filling Recipe is located here on the blog.
In a large bowl, add flour and salt, mixing the two ingredients together so as to distribute your salt throughout your flour. I then add the olive oil and then about half of the water. I prefer to mix my dough by hand as to better control the mix rate and moisture levels. Working from the outside of the bowl towards the center (not unlike folding a cake batter) I work the dry into the wet, adding small amounts of my remaining water as I go. You will end up with a lovely dough ball after 3 to 7 minutes of mixing and kneading your ingredients.
If your dough is too wet, add small amounts of flour and continue to knead, if it is too dry, add small amounts of water and continue to knead. You will discover that finding the balance is quite simple, so breathe, be happy and laugh at the joy of your creation. As an aside, you can wear latex gloves for the mixing part to keep your hands clean, just be sure to buy gloves that do not have a coating or powder on the them.
Once you have your dough made, move to a flat surface for rolling out your pasta. I have a wooden island in the center of my kitchen with a wooden butcher block for a top. I clear this, clean it thoroughly and then dust the top with flour. I separate my dough into 2 separate balls, roughly the same size. Using a french rolling pin (any type of roller will do of course), I place one of the dough balls into the center of my working area and begin rolling out my pasta, being sure to flour the dough and rolling pin as needed to avoid sticking. Flipping the dough a few times and rolling in all 4 directions, I create a rough circle, attempting to roll out a fairly thin sheet. Not so thin that you can see through the pasta and noting that your thickness of pasta is by and large a personal preference as a chef. I recommend starting thinner than thicker and seeing what you and your dinner guests like the most.
With Ravioli, you have a top and a bottom with your filling inside. Once your dough is rolled out, gently fold it in half so as to create a crease. Then flatten it back out on your working surface. Using a sharp knife, follow the crease line and cut your pasta into 2 separate pieces. Now you have a top and a bottom for your ravioli! Using a pastry brush , gently sweep any excess flour off of your top and bottom sections. You will also need a small bowl of water with an applicator brush (I use a silicone basting brush), your ravioli stamp, a large plate with wax paper and your filling.
A note on ravioli cutters . There are a lot to choose from and not everyone uses a cutter at all. You can use a knife and freehand cut your raviolis. I prefer a hand cutter as they are not only inexpensive, but create perfect raviolis that are all the same size with crimped and finished ends. This allows for easier serving and plate presentation, especially if you are carefully monitoring your food intake levels with each meal. I use the single ravioli cutter made by Chef Mario Batali, mainly because I like the size and the color is orange which makes me smile. You can use whatever cutter makes you happy! Some of you may be wondering why I am not using a hand crank pasta machine with the ravioli attachment as that does appear to be a quick method. I prefer the hand made attention that goes into each ravioli as you prepare the dish... and by the time you set up your hand crank and get everything sorted, you have spent about the same amount of time.
Now that you have your pasta dough rolled out and cut into 2 roughly equal halves and all excess flour has been brushed off, take your stamp and gently imprint the shape into one side of your dough. This allows you to see how many raviolis will fit on the pasta you have rolled out while also marking where you will place your filling for each one. imprinting is not cutting, so don't press all the way down as to cut the raviolis out of the pasta.
Using a small spoon, place a liberal amount of your filling into the center of each of your ravioli imprints. I have found that more is better when using a hand stamp, just be sure not to overflow onto the edges of your imprint as you want a clear space around each filling (see the photo below).

Once you have placed all of your fillings onto the scored bottom piece of pasta dough, its time to move your attention to the top piece. Using your applicator brush and small bowl of water, brush the top of the other pasta dough half so as to cover its surface area. You are not looking to soak the dough, just get the gluttons going which creates a sticky surface. Then, taking your time, carefully flip the dough over so that the wet surface is facing down above your fillings. Align your bottom and gently place this top layer onto the bottom later. Do not press down on any edge just yet. First make sure that you are covering all sides, adjusting your dough as necessary. Then, beginning on one side, use your fingers to press the dough edge together and begin moving between all of your little filling mounds, pushing the dough together while moving any air bubbles out towards the other side.

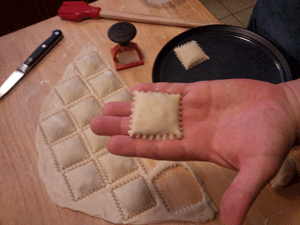
Once you have completed this step, take your ravioli cutter and begin stamping out each ravioli by aligning the stamp with the center of your filling and pressing straight down, cutting all the way through to your work surface. Then you can twist your cutter left and right, gently, so as to free each ravioli. Be sure to place a single sheet of wax paper on a plate and then place each ravioli onto the sheet. Do not let them touch or they will stick together. You may stack them with a sheet of wax paper between each layer, but I would not stack higher than 2 levels as these little guys weigh more than you think!

Once you have cut all of your raviolis you can then move onto the other dough ball that you separated out earlier, repeating all of these steps. This dough recipe with a 2" ravioli stamp should yield between 20 and 30 individual raviolis depending on how thin/thick your pasta dough is and how close together you place your stamps. You may refrigerate your finished ravioli until you are ready to boil them, which I recommend you do within 15 minutes of plating. You can also freeze them for later use, which should be done at this point, not once they are cooked. I also recommend sealing them in a single layer using a vacuum press machine , for maximum freshness.
To cook the ravioli, simply take a large pot, add water, a pinch of good salt and a few drops of extra virgin olive oil. When the water comes to a boil, add your raviolis one at a time. Stir the pot gently. When the raviolis float to the surface of your water, they are done and can be plated. Fresh pasta cooks much faster than dry pasta, so your raviolis will be done within 3 to 5 minutes once they enter the boiling water bath.

To plate, I recommend 6 to 12 ravioli, depending on your plate size and if this is a main course or an appetizer. The type and richness of your filling will also dictate how many you choose to serve. Add your sauce or oil topping and garnish.
Buon Appetito!!
Rushing home with my new found $5.00 culinary toy, I began experimenting with vegan pasta doughs and organic fillings. I wound up creating 2 different types of ravioli, which were both served for Christmas Eve dinner: Baby Bella Ravioli and Roasted Butternut Squash with Sage Ravioli. This was offered with my homemade organic Italian bread (that will be a recipe for another posting).
Here I present the recipe for the Ravioli Pasta Dough and its preparation.
Simple Vegan Pasta Dough
2 cups flour (white flour is what I used, though you may substitute/mix whole wheat)
2 teaspoons of extra virgin olive oil
1/2 cup water
2 pinches of good salt
Baby Bella Mushroom Filling Recipe is located here on the blog.
In a large bowl, add flour and salt, mixing the two ingredients together so as to distribute your salt throughout your flour. I then add the olive oil and then about half of the water. I prefer to mix my dough by hand as to better control the mix rate and moisture levels. Working from the outside of the bowl towards the center (not unlike folding a cake batter) I work the dry into the wet, adding small amounts of my remaining water as I go. You will end up with a lovely dough ball after 3 to 7 minutes of mixing and kneading your ingredients.
If your dough is too wet, add small amounts of flour and continue to knead, if it is too dry, add small amounts of water and continue to knead. You will discover that finding the balance is quite simple, so breathe, be happy and laugh at the joy of your creation. As an aside, you can wear latex gloves for the mixing part to keep your hands clean, just be sure to buy gloves that do not have a coating or powder on the them.
Once you have your dough made, move to a flat surface for rolling out your pasta. I have a wooden island in the center of my kitchen with a wooden butcher block for a top. I clear this, clean it thoroughly and then dust the top with flour. I separate my dough into 2 separate balls, roughly the same size. Using a french rolling pin
With Ravioli, you have a top and a bottom with your filling inside. Once your dough is rolled out, gently fold it in half so as to create a crease. Then flatten it back out on your working surface. Using a sharp knife, follow the crease line and cut your pasta into 2 separate pieces. Now you have a top and a bottom for your ravioli! Using a pastry brush
A note on ravioli cutters
Now that you have your pasta dough rolled out and cut into 2 roughly equal halves and all excess flour has been brushed off, take your stamp and gently imprint the shape into one side of your dough. This allows you to see how many raviolis will fit on the pasta you have rolled out while also marking where you will place your filling for each one. imprinting is not cutting, so don't press all the way down as to cut the raviolis out of the pasta.
Using a small spoon, place a liberal amount of your filling into the center of each of your ravioli imprints. I have found that more is better when using a hand stamp, just be sure not to overflow onto the edges of your imprint as you want a clear space around each filling (see the photo below).

Once you have placed all of your fillings onto the scored bottom piece of pasta dough, its time to move your attention to the top piece. Using your applicator brush and small bowl of water, brush the top of the other pasta dough half so as to cover its surface area. You are not looking to soak the dough, just get the gluttons going which creates a sticky surface. Then, taking your time, carefully flip the dough over so that the wet surface is facing down above your fillings. Align your bottom and gently place this top layer onto the bottom later. Do not press down on any edge just yet. First make sure that you are covering all sides, adjusting your dough as necessary. Then, beginning on one side, use your fingers to press the dough edge together and begin moving between all of your little filling mounds, pushing the dough together while moving any air bubbles out towards the other side.

Once you have completed this step, take your ravioli cutter and begin stamping out each ravioli by aligning the stamp with the center of your filling and pressing straight down, cutting all the way through to your work surface. Then you can twist your cutter left and right, gently, so as to free each ravioli. Be sure to place a single sheet of wax paper on a plate and then place each ravioli onto the sheet. Do not let them touch or they will stick together. You may stack them with a sheet of wax paper between each layer, but I would not stack higher than 2 levels as these little guys weigh more than you think!
Once you have cut all of your raviolis you can then move onto the other dough ball that you separated out earlier, repeating all of these steps. This dough recipe with a 2" ravioli stamp should yield between 20 and 30 individual raviolis depending on how thin/thick your pasta dough is and how close together you place your stamps. You may refrigerate your finished ravioli until you are ready to boil them, which I recommend you do within 15 minutes of plating. You can also freeze them for later use, which should be done at this point, not once they are cooked. I also recommend sealing them in a single layer using a vacuum press machine
To cook the ravioli, simply take a large pot, add water, a pinch of good salt and a few drops of extra virgin olive oil. When the water comes to a boil, add your raviolis one at a time. Stir the pot gently. When the raviolis float to the surface of your water, they are done and can be plated. Fresh pasta cooks much faster than dry pasta, so your raviolis will be done within 3 to 5 minutes once they enter the boiling water bath.

To plate, I recommend 6 to 12 ravioli, depending on your plate size and if this is a main course or an appetizer. The type and richness of your filling will also dictate how many you choose to serve. Add your sauce or oil topping and garnish.
Buon Appetito!!
___________________________________________________
If you would like to assist in supporting my blogging and recipes, please consider making a donation towards the next meal. Healing the world's health one lentil at a time. Blessings.
Subscribe to:
Posts (Atom)